Exponential Episode 28: Hiding the Wiring
The most important milestone in crypto, argues Nic Roberts-Huntley, will be the one that goes completely unnoticed. In this episode
The most important milestone in crypto, argues Nic Roberts-Huntley, will be the one that goes completely unnoticed. In this episode
Nexus founder and CEO Daniel Marin appeared on the Exponential podcast this week to address the company's decision
If you've been paying attention, you probably saw that we were building toward 3.17. You made a

The Nexus Command-Line Interface (CLI) is the fastest on-ramp for contributing compute to the world supercomputer. If you’re comfortable in a terminal — or eager to learn — this guide will take you from zero to your first verified proof in about ten minutes.
Learn more about the CLI in this Nexus Chat:
A command-line tool might feel retro in a world of slick dashboards, but it carries three advantages that matter when you’re contributing heavy workloads:
For contributors who prefer point-and-click, the Nexus app (our browser-based experience) lowers the barrier of entry even further. But if you need repeatable deployments, remote machines, or detailed telemetry, the CLI is the tool of choice.
In fact, most large node operators on Devnet and Testnet II ran headless clusters exclusively through the CLI, enjoying the same rewards with more control. The CLI and web interface ultimately talk to the same Orchestrator, so you can switch at any time.
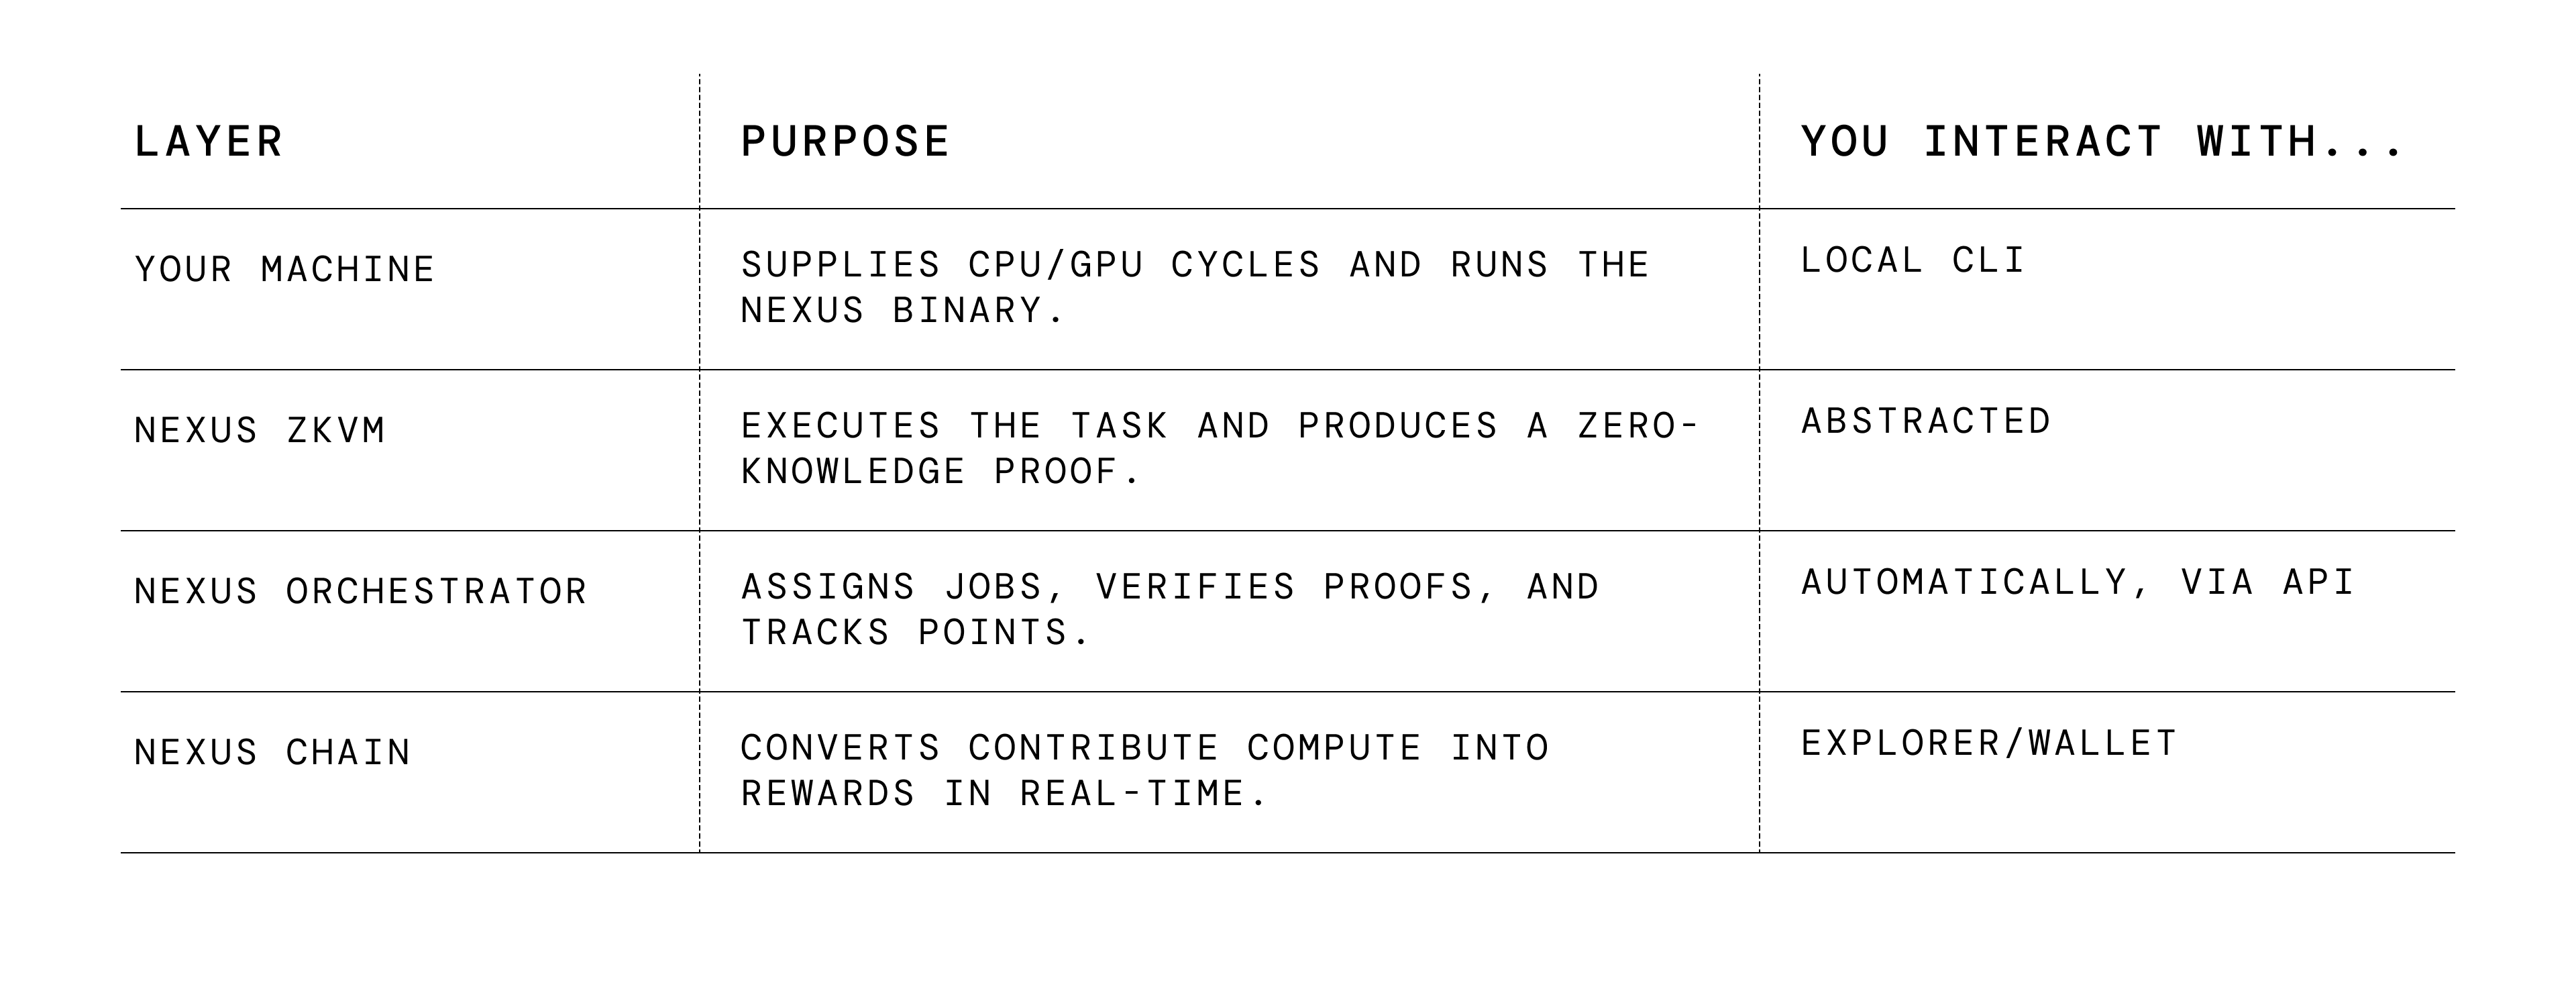
Whether you connect via the web interface or CLI, the workflow is identical: receive job → prove → submit → earn. What changes is the level of ergonomics and automation under your control.
The Nexus CLI ships as a single self-updating binary, so there’s no need to clone or compile. On macOS, Linux, and WSL you can run the following one-liner:
curl https://cli.nexus.xyz/ | shThen, to start the CLI in interactive mode with an existing node ID, run:
nexus-cli start --node-id <your-node-id>In order to get a new node ID, you can register your wallet address and create a node ID within the CLI, or at app.nexus.xyz.
nexus-cli register-user --wallet-address <your-wallet-address>
nexus-cli register-node
nexus-cli startMost issues boil down to three categories:
Network reachability — Ports 443 and 8443 must reach orchestrator.nexus.xyz.
Out-of-date binary — Run the install command to get the latest CLI release:
curl https://cli.nexus.xyz/ | shHardware limits — Laptops may throttle under sustained load. Use --max-threads or point the CLI at a beefier server.
If you hit a blocker:

Both experiences yield identical rewards — what differs is operational style. Many users start in the browser to learn the ropes and graduate to the CLI once they’re comfortable.
The promise of the Verifiable Internet is bigger than any single product, but progress starts with many machines contributing small proofs around the clock.
Whether you’re a weekend hacker or an enterprise ops team, the steps above get you staking your compute — secure, automated, and under your full control.
Grab the binary, spin up a node, and let your terminal do something extraordinary.
For more info on the Nexus CLI:

If you've been paying attention, you probably saw that we were building toward 3.17. You made a

In 2025, Nexus moved from early momentum to structural foundation. What began as a cryptographic vision has become a global

NexusCore is the architecture designed for high performance and as an engine to power verifiable markets Modern financial systems depend

After several months of steep acceleration, November reads as a month of consolidation for the Nexus proving network. Some indicators